こちらはほぼ自分向けの備忘録です。
少し前はmujocoは有償かつ、ライセンス形態の関係でdocker上では使いにくかったので嫌厭してましたが、我らがDeepMindのおかげで無料で使えるようになった時はなかなか衝撃でした。
Gigazineの記事を見てみたら、もう1年以上前か・・・
と言うことで、研究向けの環境をmujocoで作ってみようかと思ったのですが、定義ファイルのMJCFを作るのが無知すぎて大変だったので、わかったことのメモ。mujocoの日本語情報少なくて辛い・・・。
mujocoのXML Referenceのリファレンスを見ながら試行錯誤しましたが、理解できてないところもあるかもなのでご承知おき下さい。
今回作った環境
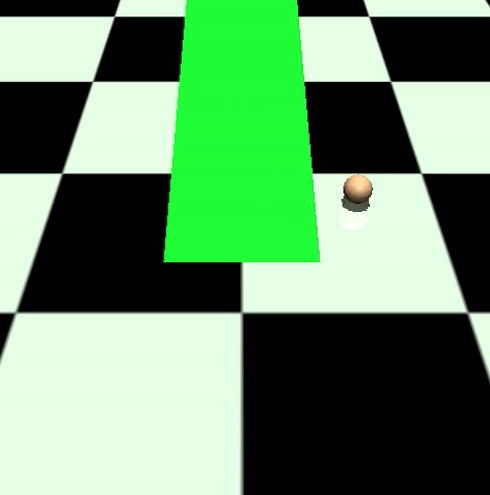
今回作りたかったのはこんな環境です。
ちょっと正面の図だとわかりにくいのですがこの緑のブロックは傾斜になっており、手前から奥に向けて10°で高くなっていっています。
操作するエージェントは緑のブロックの隣にある球体です。

MJCFファイルはこちら
open ai gymのリポジトリに用意されているpoint.xmlを改造して作っていきましたので、次章では改造ポイントをメインに説明していきます。
<mujoco>
  <compiler angle="degree" coordinate="local" inertiafromgeom="true"/>
  <option integrator="RK4" timestep="0.02" gravity="0 0 -2.0"/>
  <default>
    <joint armature="0" damping="0" limited="false"/>
    <geom conaffinity="0" condim="3" density="100" friction="1 0.5 0.5" margin="0" rgba="0.8 0.6 0.4 1"/>
  </default>
  <asset>
    <texture builtin="gradient" height="100" rgb1="1 1 1" rgb2="0 0 0" type="skybox" width="100"/>
    <texture builtin="flat" height="1278" mark="cross" markrgb="1 1 1" name="texgeom" random="0.01" rgb1="0.8 0.6 0.4" rgb2="0.8 0.6 0.4" type="cube" width="127"/>
    <texture builtin="checker" height="100" name="texplane" rgb1="0 0 0" rgb2="0.8 0.8 0.8" type="2d" width="100"/>
    <material name="MatPlane" reflectance="0.5" shininess="1" specular="1" texrepeat="30 30" texture="texplane"/>
    <material name="geom" texture="texgeom" texuniform="true"/>
  </asset>
  <worldbody>
    <light cutoff="100" diffuse="1 1 1" dir="-0 0 -1.3" directional="true" exponent="1" pos="0 0 1.3" specular=".1 .1 .1"/>
    <geom conaffinity="1" condim="3" material="MatPlane" name="floor" pos="0 0 0" rgba="0.8 0.9 0.8 1" size="40 40 40" type="plane"/>
    <body name="torso" pos="0.8 1 0">
      <geom name="pointbody" pos="0 0 0.1" size="0.1" type="sphere"/>
      <joint axis="1 0 0" limited="false" name="ballx" pos="0 0 0" type="slide"/>
      <joint axis="0 1 0" limited="false" name="bally" pos="0 0 0" type="slide"/>
      <joint axis="0 0 1" limited="false" name="ballz" pos="0 0 0" type="slide"/>
    </body>

    <body name="block" pos="0 0.5 -1">
      <geom conaffinity="1" condim="3" name="block_box" pos="0 0 0" euler="10 0 0" size="0.5 3 1" rgba="0 1 0 1" type="box"/>
    </body>
  </worldbody>
  <actuator>
    <!-- Those are just dummy actuators for providing ranges -->
    <velocity ctrllimited="true" ctrlrange="-1 1" joint="ballx"/>
    <velocity ctrllimited="true" ctrlrange="-1 1" joint="bally"/>
    <velocity ctrllimited="true" ctrlrange="-1 1" joint="ballz"/>
  </actuator>
</mujoco>
各種設定項目
重力の設定
3行目のoptionの項目で設定します。
デフォルト値は(x, y, z) = (0, 0, -9.81)となっています。
今回はz軸方向に動きやすいように(0, 0, -2.0)で設定しています。
<option integrator="RK4" timestep="0.02" gravity="0 0 -2.0"/>操作対象である球体の設定
18~23行目のbodyの項目で設定しています。
形状はgeomのtypeで指定します。
選択肢は[plane, hfield, sphere, capsule, ellipsoid, cylinder, box, mesh]とありデフォルトはsphereつまり球体です。
制御するためのアクチュエータの設定を後ほど行うのですが、アクチュエータを設置するためのジョイントをここでは指定します。jointの項目ですね。
typeの選択肢は[free, ball, slide, hinge]とありデフォルはhingeです。
今回はxyzの各軸にslideを設定しました。freeでも良かった気がしますが、そのうち試してみよう。
    <body name="torso" pos="0.8 1 0">
      <geom name="pointbody" pos="0 0 0.1" size="0.1" type="sphere"/>
      <joint axis="1 0 0" limited="false" name="ballx" pos="0 0 0" type="slide"/>
      <joint axis="0 1 0" limited="false" name="bally" pos="0 0 0" type="slide"/>
      <joint axis="0 0 1" limited="false" name="ballz" pos="0 0 0" type="slide"/>
    </body>
アクチュエータの設定は29~34行目でしています。
ここでは各アクチュエータがどういった制御を行なって、値の範囲をどうするかを定義しています。
選択できるアクチュエータは[motor, position, velocity, intvelocity, damper, cylinder, muscle, adhesion]とあり、今回はvelocity、つまり速度制御を設定しています。
  <actuator>
    <!-- Those are just dummy actuators for providing ranges -->
    <velocity ctrllimited="true" ctrlrange="-1 1" joint="ballx"/>
    <velocity ctrllimited="true" ctrlrange="-1 1" joint="bally"/>
    <velocity ctrllimited="true" ctrlrange="-1 1" joint="ballz"/>
  </actuator>
傾斜のブロックの設定
傾斜のブロックの設定は25~27行目で設定しています。
今回はかなり横着しており、長方形のブロックを回転させて傾斜にするという荒技をしています。
ほんとはtype=meshとかでCADとかで作った図を読み込むんだろーな・・・。
type=boxで長方形を作り、euler="10 0 0"でx軸で10°回転させています。
    <body name="block" pos="0 0.5 -1">
      <geom conaffinity="1" condim="3" name="block_box" pos="0 0 0" euler="10 0 0" size="0.5 3 1" rgba="0 1 0 1" type="box"/>
    </body>
出来上がった環境で球体を動かす
と言うことで出来上がった環境で球体を動かすとこんな感じ。
赤い丸がゴールでそこに向かって球体が移動しています。
ちなみに球体の制御は強化学習とかではなく、手で制御入力を決めていますのであしからず。


コメント